Pages

Monday, January 28, 2013

Project Life - Week 3

Just a quick update to post that I finally got week three finished in this year's Project Life.  It was a busy week for us, my birthday was this week, so there is an insert with details from our dinner out and a little scrappy fun with friends!  :)  I am still trying to keep my spreads relatively flat, but this week I did include some fun veneers and a few Thickers on the pages.
Left side of spread and front of insert.


Back of insert and right side of spread.

Close-up of the left side


Close up of front of insert

Close up of the back of the insert.


 Thanks for looking!!

A

Friday, January 25, 2013

January Flamingo Four

Hello All!

For our Flamingo Four assignment for January, we were given a piece of the Graphic 45 Le Romantic "Well Groomed Man" paper, a large Tim Holtz tag, some buttons and some black pearl trim.


When I saw the "Well Groomed Man" paper, it reminded me of our wedding, and how handsome all of the groomsmen were!  So, I decided to make a mini-book using various elements cut from the paper, plus cardstock and ribbons that were actually used in items that I made for our wedding.  The lace trim on the picture pages can also be found in the Flamingo Scraps store.

Here is the cover to my album, using images cut from the G45 paper and accents using the button and the black pearl trim.

A picture of my husband with the title "The Well Groomed Man" fussy cut from the G45 paper. 

The inner pages of my husband with his groomsmen.

An inner divider page using the reverse side of the G45 paper, the top hat fussy cut from the paper and strips of cardstock in our wedding colors.

A group shot of the guys.

Another divider page taken from the G45 paper

A picture of our hands during the ceremony - I thought this went well with the sentiment from the divider page. It is attached to the Tim Holtz tag, which was trimmed to fit this album.  I have put two hearts cut from the same cardstock that was on the top hat page to cover the reinforced hole because it did not go with the color scheme for this album.

The back cover of the book.  
 This is always such a great adventure to see what everyone else came up with!  Head on over to the Flamingo Scraps Blog to see what Melissa, Ramona and Cindy came up with too!

Until next time!
A

Monday, January 21, 2013

An Early Valentine's - Flamingo Scraps


Good Morning!

Alicia here, back again to show you a lovely little card that I created with the Pink Paislee Secret Crush Collection that you can find in the Flamingo Scraps store!

I started out with a blank white card and cut a piece of the doily paper that can be found in the paper pack to cover the front of the card.  Then came the fun part!  I used elements from the Secret Crush Photo Frames and the Paper Goods Die Cuts to layer on the cutest touches!  To add a little texture, I added one of the vellum feathers from Jenni Bowlin.  The little square with the sentiments on front is cut from another one of the great papers in the paper pack.


After all of the goodness on the front of the card, the inside looked way too bare, so I added a piece of another one of the papers in the pack and this cute "eye chart" from the die cuts pack.


This line is great, and doesn't just have to be used for Valentine's Day.  Any time you need a shot of pink, this would be a great addition to any project!  

Until next time!

Friday, January 18, 2013

Project Life - Week 2

Yay!  I am really trying to stay on top of Project Life this year (which is good, since I am STILL working on the journaling, etc for 2012!)  This week, in addition to the two page spread, I have a small insert of our trip to Pump-It-Up, using Becky Higgins' Design H.  I really used stuff from my stash this week, instead of one of the kits, and decided to try to make the week look like it belonged together.  :)

This week with the insert.

The two page spread showing the back of the insert.
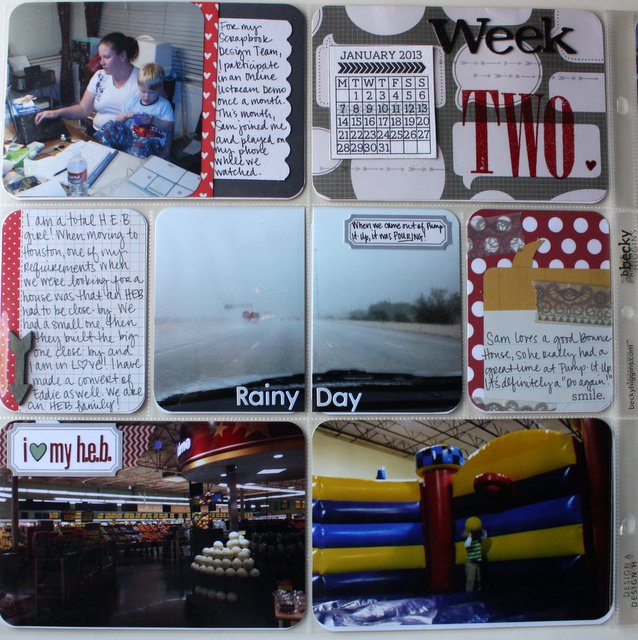
The left side of the spread.

The right side of the spread.

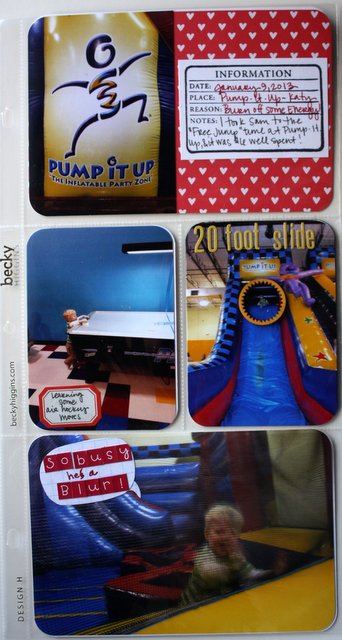
The front of the insert.

The backside of the insert.
In case any one was wondering, my process for PL every week always starts out with two of the Design A pages, and then if we did a special activity that warranted extra pictures, I use one of the other design pages to supplement in the middle.   This is my third year to do Project Life, and I still love this project!!  I am always experimenting with the look and feel of it, and it continues to be so much fun.

Hope everyone one enjoyed this week!
Until next time!
A

Thursday, January 10, 2013

2013 Project Life - Week 1

Hi All!!

In an effort to try to stay up-to-date with Project Life this year - I am still working on journaling for 2012 - I am going to start posting my weeks as I get them finished. This year, I have decided to run my weeks from Monday to Sunday, to make it easier to keep the weekends together, and am trying to keep things as flat as possible, so lots of stamps, letter stickers and washi tape will be seen.  :o)

I think that all of the cards I used this week were free printables that I found on Pinterest.  I need to put together a list with links to share.  If you have any other questions, let me know, and I will do my best to answer them!

Here is the full two page spread.
Left Side

The right side for the week.

This is why it is easier for me to take pictures of projects when the boy is asleep, or otherwise occupied. 

Thanks so much for looking!

Until next time!
A

Friday, January 4, 2013

Happy Together - Flamingo Scraps

Good Morning Everyone!

It's Alicia here, and I am back to show you my latest layout using the Teresa Collins Now and Then Collection that you can find in the shop at Flamingo Scraps!  

When my husband and I were getting married, we were living in Houston, but planning the wedding in my hometown (outside of Austin.)  Luckily for us, our photography company had an office in Houston as well, so we decided to have our engagement photos taken here.  I was working downtown at the time, and when the photographer suggested the area around the Wortham Center, we accepted immediately.  I really loved how the pictures turned out with an urban feel, but also with plenty of trees to be seen as well.  

For this layout, I used various papers from the Now and Then Collection.  Our wedding colors were navy with accents of lime green, so I loved that the floral pattern featured both of these colors and also the pink color that played well with Eddie's shirt.  I also used the Now and Then chipboard accents to add a little dimension and the border strips to add a little glitz to the layout.


Here is a close up of the great banner using the chipboard accents and a little tag from the accessories sheet that comes in the collection.  

So, if you are interested in getting this look, just head on over to the shop and grab the Now and Then collection pack and chipboard accents by Teresa Collins, you will LOVE them!  

Also, don't forget to tune in to Tonya's next Ustream presentation on Monday, January 7th, where she is going to show you how to create an awesome layout using Pink Paislee's Portfolio collection!

Until next time!
Alicia

Thursday, January 3, 2013

Quick Post - PL Swap Cards.

Just a quick update to share a set of cards that I recently made for a Project Life card swap.  I think they turned out pretty well.  :o)  I used the "Beautiful" Project Life Clear Stamps that are exclusive to Two Peas for the border on the bottom, and the sentiment, which I embossed on cardstock then cut into flags.  I added some gray and teal washi and called it done!


Wednesday, January 2, 2013

December Daily - Days 8 - 17

Hi!  I am back with the next installment of my completed December Daily pages.  This is going to be a picture heavy/word light post!  Enjoy!

Day 8 and Day 9
The back of day 8 shows me and my college roommate and my son enjoying his slush on the ride home.  Day 9 shows my husband and son watching cement trucks pour a slab in my in-laws neighborhood.  My son LOVES big trucks.

Day 9 and Day 10
My neighbors actually have the Leg Lamp in their front window.  Day 10 is a picture of our tree.

Day 10 and Day 11
Day 10 shows the lights on our house, and day 11 is my son getting a haircut.

Day 11 and Day 12
Day 11 - after the haircut, and day 12 is my husband, son and father sitting on my couch.

Day 12 and Day 13
The back of day 12 shows the wall of Cracker Barrel, where my mother-in-law and I had lunch that day.  The front of day 13 are the tags that came on gifts that Sam received from his teachers and an ornament they made for the parents.

Day 13 and Day 14
The back of day 12 shows the Hand Sanitizers that I made for the office staff at my son's school.  Day 14 is a small envelope that contains my Aunt' who passed away this week's obituary 

Day 14 and Day 15
Day 14 is the back of the small envelope and day 15 are some pictures of Christmas lights in our area.

Day 15 and Day 16
Day 15 is my silly son with his fingers in his nose and day 16 is just a Bingo Card.

Day 16 and Day 17
Day 16 is my son helping my mother wrap gifts and day 17 is just a cover page for our card.

Day 17
Our Christmas Card